Up next: Hints for Creating a Hybrid-Format Course
Overview
In this page, I will describe how I created the lecture videos and integrated them with the embedded quiz questions. I’m now working on a new hybrid course (an introductory psychology course), and I’m doing some things differently (and better, I hope). I’ll describe the way I actually created the existing Intro Cognitive course, with a few comments about how I’ve changed my approach for the new course. I’ll start with a big-picture overview of the process, and then I’ll discuss the details.
To record the lecture videos, I used a program called Screenflow, which is only for Macs. There is a very similar program called Camtasia that is more widely used and is available for both Macs and PCs. I have a slight preference for Screenflow, but the programs are quite similar. They allow you to record yourself giving lectures, edit the recordings, and upload them to YouTube (or save them to disk in standard video formats). You could also use professional video production software, but Screenflow and Camtasia are designed for recording and editing lectures and are easier to use and less expensive. The basic idea is that you give your lecture with PowerPoint, just as you would in a live lecture, and the software captures the PowerPoint presentation on your screen (as a video, including any animations and mouse movements) and also records your “talking head” via a webcam. You can easily insert additional text, graphics, audio, and video clips. You then upload the video to YouTube (or whatever system you’re using to host your videos).
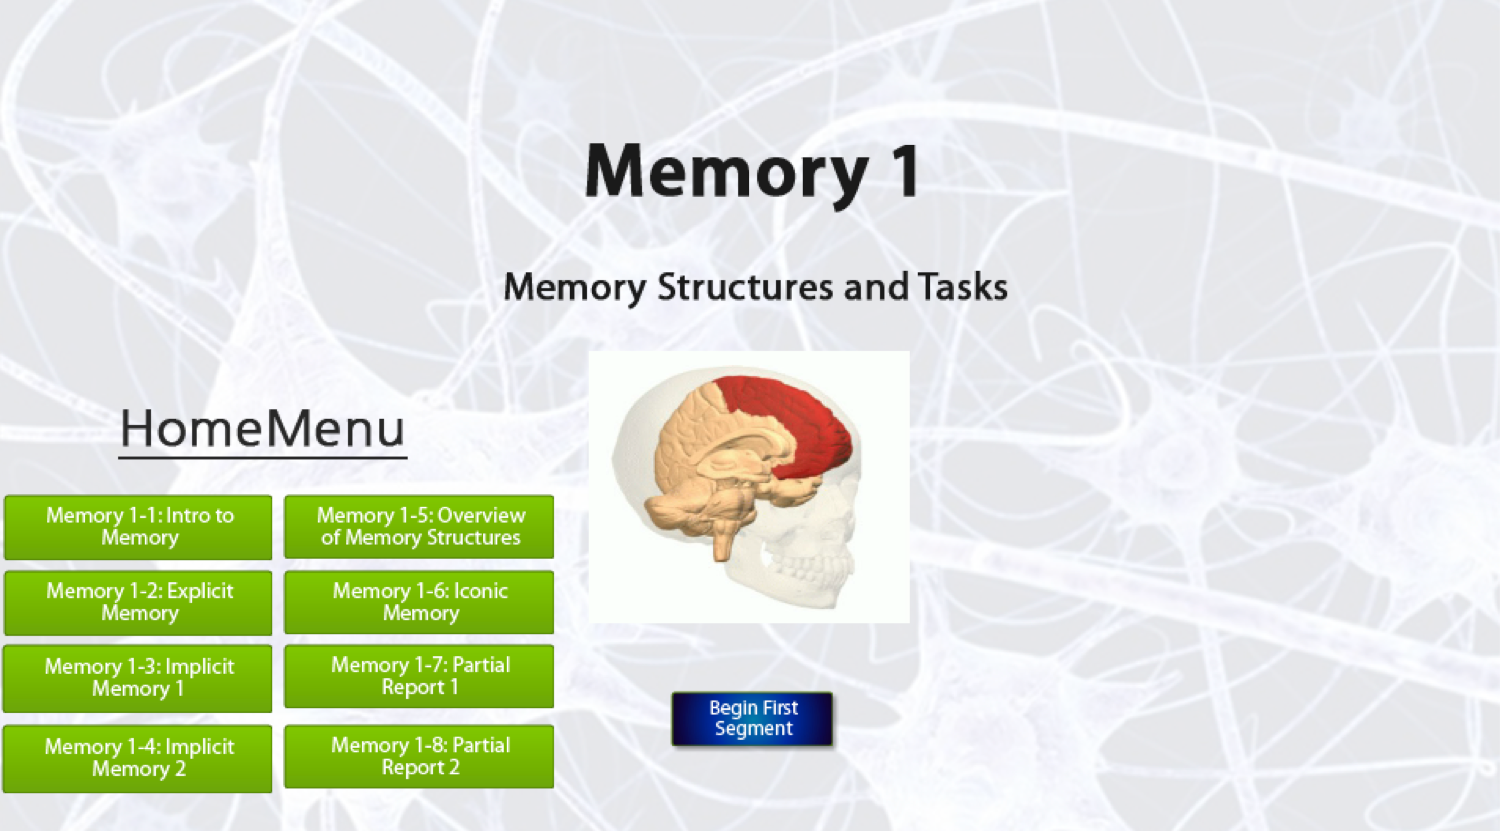
To link multiple lecture segments together, with interposed quiz questions, I use Adobe Captivate. Captivate allows you to create a set of “slides”, some of which contain embedded YouTube videos and others of which contain quiz questions. You can also include a “table of contents” slide at the beginning, as in the screenshot below. Captivate turns the slides into a set of web pages. There is an online service called Zaption that provides a simpler and prettier way of doing this, but I found that it was too limited (e.g., if you replaced one of the YouTube videos in a sequence of lecture segments, you had to recreate all the questions for that video).
 I upload the Web pages created by Captivate to our LMS (SmartSite, aka Sakai), which allows me to create links from the Modules tool to the subunit videos. Here’s a video of what it looks like when a student accesses this Web page from SmartSite:
You can click here to see the actual Web page created by Captivate. An alternative approach (which might be necessary for some LMSes) would be to use a service like Microsoft Azure or Amazon Web Services to host the Web pages created by Captivate.
There was no easy way to get quiz scores from Captivate into our LMS. This is something that will doubtless improve as these technologies mature. I therefore followed each subunit lecture with an additional quiz delivered via our LMS (which I call “SmartSite quizzes”). This was originally just a kludge I used to get around my inability to get the scores from Captivate into our LMS, but it turned out to be a great way to do things: Students were quizzed twice on each lecture segment, once immediately and once after a delay of 5-30 minutes. In addition, the students could do the embedded quiz questions without worrying about grades, allowing them to focus on learning. I would continue doing it this way even if I gained the ability to get the scores from the embedded quiz questions into the LMS.
General Design of Lecture Videos
It is really easy to create bad lecture videos. If you simply record yourself giving a live lecture, it will look terrible on video, and students won’t watch it. I experimented a great deal, and I eventually developed a general design that worked well. It turns out that there is empirical evidence that supports the effectiveness of some of the key aspects of this design. The best evidence comes from a study that examined how measures of student engagement with lecture videos (e.g., how much time they spend watching a given video) varied across a large set of lecture videos from four EdX MOOC courses (Guo et al., 2014). Here is a summary of their key findings:
- Shorter videos (<= 6 minutes) are more engaging than longer videos
- The instructor’s “talking head” should be included at least some of the time
- It helps to have a “personal feel” in which the instructor appears to be talking directly to the student
- Dynamic content is helpful (especially the tablet drawing style used by Khan Academy and others)
- Recordings of live classroom lectures tend not to be very engaging (even when high quality)
- A fast speaking rate and high levels of enthusiasm make a lecture more engaging
Timing
My shortest segments are about 3 minutes, and my longest segments are about 8 minutes. If you find that a lecture segment is getting longer than 8 minutes, there is probably a natural breaking point to divide it into two shorter lectures. If there is no obvious breaking point, then the lecture is probably not well organized: it’s unlikely that a student watching a lecture will understand something that requires more than 8 minutes to make a single coherent point!
Talking Head and Notes
It is a pain to include your “talking head” in your lecture videos. Recording live video is more complicated than recording audio, and editing video can be a major pain. You can’t just delete a word here and insert a word there. However, your talking head will make the lectures more engaging and more personal. I include my talking head in perhaps 80% of my videos. I also included occasional references to my personal life (e.g., stories about my children) to make the lectures more personal.
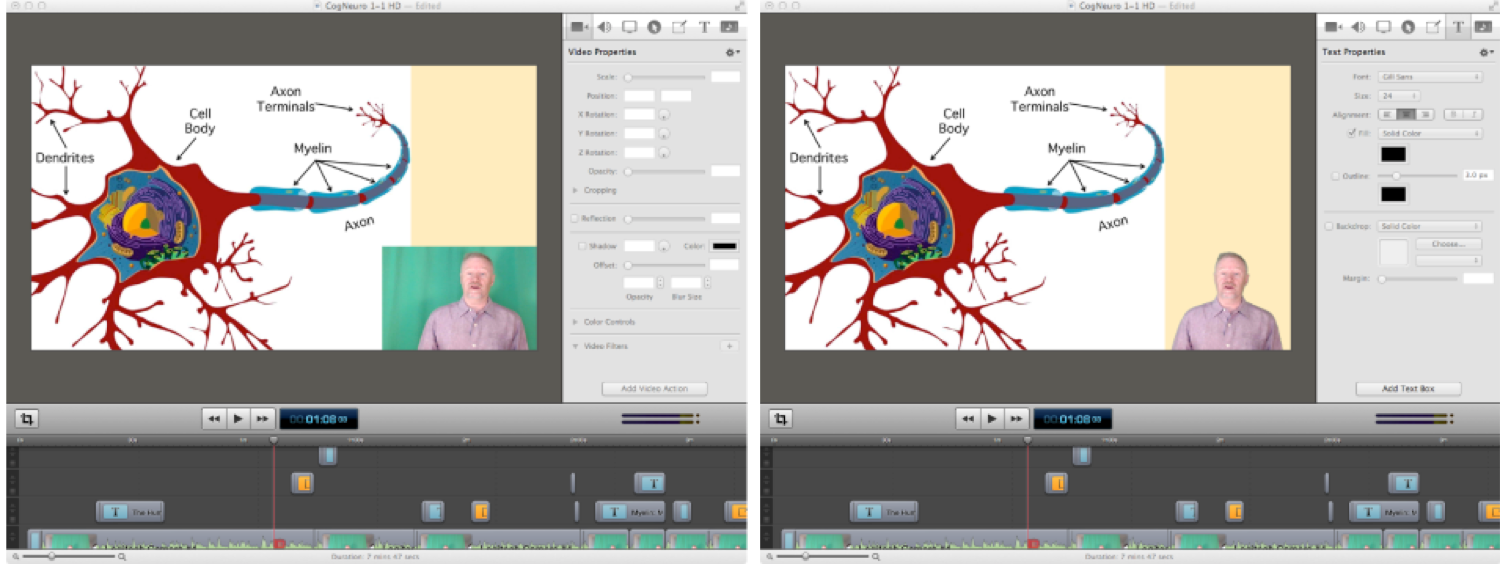
The image to the right shows a single frame from one of my lecture videos. The standard YouTube format is widescreen (16:9), whereas most PowerPoint presentations use the VGA aspect ratio (4:3). This makes it convenient to put the PowerPoint slide in the left portion of the video, leaving a sidebar on the right. My “talking head” is usually shown in this sidebar so that it doesn’t obstruct the PowerPoint slides. And then I take the main points from my lecture and have them appear as text in the sidebar. This is a cue to the students that something is important.
Dynamic Content
I did not try Khan-style tablet drawing; it didn’t seem appropriate for the kind of material I was presenting. However, I inserted as much dynamic content as possible into the lecture videos. Sometimes, this involved using the mouse pointer to point to various parts of the PowerPoint slide while I was recording the PowerPoint slides. Sometimes this involved adding arrows and boxes to highlight key elements of a slide. And frequently it involved having elements of a slide appear as they were mentioned. Also, I made sure that I never talked with the same static image on the screen for more than about 30 seconds. If the video is static, the viewer’s attention will wander.
When there was no real visual information to be delivered, I displayed images that I found on the Internet that were at least tangentially related to what I was saying. An alternative approach would be to have the talking head fill the screen during these periods, but to be honest I couldn’t stand to see my own face in such great detail.
Classroom Lectures
I was teaching the traditional version of the course while I was shooting many of the lecture videos, and I was struck by how much more energy I could generate during the traditional live lectures. I recorded some of these lectures, hoping that I might be able to use them in the hybrid course and capture some of the energy of the live lectures. However, when I looked at the recordings, it was clear that they would not work well in the hybrid course. The energy that was in the room during the live lectures apparently stayed in the room rather than being caught on the recording, and my live lecture style is too slow and filled with too many verbal fillers to work well on YouTube. Unless you are a world-class performer (e.g., on par with Robin Williams or Stephen Colbert), you will probably not want to use video from live classroom lectures.
Speech Rate
It has been well documented that people can understand speech must faster than ordinary people can speak. You can (and should) speak much faster in a recorded video than in a live lecture. The study of Guo et al. (2014) found that students were much more engaged for rates > 165 words per minute. I tend to speak at 175-200 words/minute in my videos. You can speak much faster in videos than in live lectures because the students can pause and rewind if they didn’t catch something, and they can pause when they want to take notes. A good lecturer will speak somewhat slowly, with lots of pauses, during a live lecture, but that makes online lectures extremely dull.
The next section contains additional advice about lecture delivery.
Writing and Delivering Effective Lecture Videos
I had to completely rewrite my lectures for the video format. A lecture that is engaging and interesting when given by a live human being will seem slow-moving and boring when viewed on video. Also, in a live lecture I tend to make a lot of jokes and irreverent comments that the students find amusing, but they come off as lame or even offensive in a video. Humor needs to be a lot more subtle in a video, whereas the visuals need to be much more dynamic. As an analogy, think about how a stage production of a play differs from a movie based on the play. Whereas the stage is relatively static and the actors do all the work in a stage production, most movies are filled with dynamic visual information beyond what is provided by the actors. In a lecture video, you can’t simply talk for several minutes with a static background; instead, you need constantly changing graphics.
In addition, think about how acting differs in a live stage production versus a movie—acting on video requires more subtlety than acting in a live production (where the subtlety is invisible beyond the 3rd row). On the other hand, it’s hard to give a convincing “performance” of a lecture when you’re recording in your home office without an audience. You need to communicate your enthusiasm for the material as if you’re having a one-on-one conversation with a student, which is difficult to do when you’re speaking into a camera in an empty room. It took me quite a while to develop a lecture style that worked with videos, but it really boils down to three things: energy, prosody, and imagination. First, you need to keep your energy level up while you deliver the lectures into the camera. I discovered a simple trick for this: Stand while you are lecturing. I actually did some experimenting with this, giving the same lecture in the same way while standing and while sitting. When I played back the videos, they were much better when I had been standing (more energy!). Second, you need to exaggerate the prosody in your speaking (not quite to the level of infant-directed speech, but beyond what you’d do in a normal conversation). I found it effective to accompany the vocal prosody with a lot of gesticulation, which adds energy and increases the amount of visual action. Third, you need to imagine that you are speaking to someone—not to a whole class, but to a single person on the other side of the camera. For inspiration, just watch TV news anchors on the nightly news shows of ABC, NBC, or CBS (not Fox News or even MSNBC). Personally, I can’t come close to being Dan Rather or Tom Brokaw, but with practice I was able to avoid sounding like the wooden Al Gore of the 2000 presidential campaign.
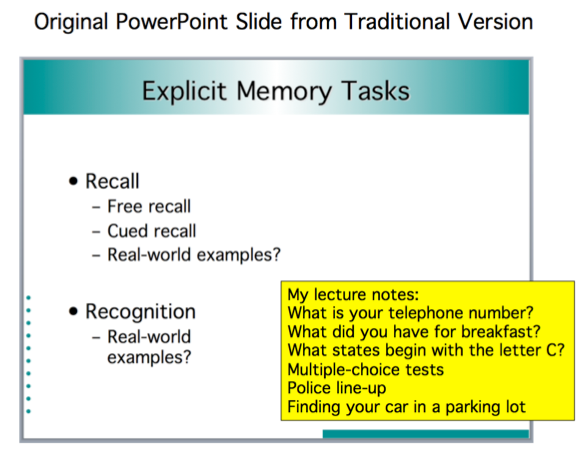 As an example of how I converted my lectures from the traditional format into a video-friendly format, take a look at the PowerPoint slide to the right from one of my original lectures. It has some bullet points along with notes about what I should say to flesh out the bullet points. You can see how I updated this lecture for video by looking at the video shown here (start around the 30 second point; the video also provides an example of prosody and gesticulation). The video version has additional graphics with some kind of change every 10-30 seconds. Some of these changes are just the appearance of a main point in the sidebar or the video equivalent of pointing (e.g., arrows appearing; a paid undergrad assistant added most of those from within Screenflow). Others are simple images that I downloaded from Google Images (but see section on Copyright below).
As described in the Hints for Creating a Hybrid Course, I developed one section of the course before I really knew what I was doing, and I inserted this unit into the traditional version of the course as a pilot study. When I recorded the lecture videos for this pilot version, I made minimal changes to the lectures and then recorded them using my Macbook’s built-in webcam. You can see an example lecture segment here. In this example, there are really only two images in the entire 4.5-minute video. However, I made extensive use of the mouse pointer, and my undergrad assistant added text in the sidebar to indicate main points. I wasn’t reading from a script, and this made it easier to have energy and dynamic prosody. On the other hand, because I was speaking extemporaneously, the lecture is longer than it would need to be. These lectures were a lot less work to make than the lectures I made in later units, but they weren’t as effective: Test scores for this unit were only slightly higher in the hybrid version than in the traditional version of the course, whereas scores for the other units were substantially higher in the hybrid version than in the traditional version (see Evidence of Effectiveness). Thus, it pays to put effort into creating lectures that are designed for video.
Scripts and Closed Captioning
One of the key elements of creating effective lecture videos is to write an actual script for each lecture. The experts recommend it, and in my experience it is very important. As an analogy, imagine that you wrote a journal article by creating the figures and then dictating the text extemporaneously with no editing. The end result would be bloated, poorly organized, hard to read, and unclear. An extemporaneous lecture won’t be quite that bad, especially if you’ve given the same lecture many times previously in a traditional version of the course. However, if you compare a carefully scripted lecture with an extemporaneous lecture, you’ll see that the scripted lecture is 30-50% shorter (because you’re not wasting time trying to generate the right way to say something) and much clearer. Once I started scripting my lectures, I discovered that the original order of my PowerPoint slides wasn’t optimal, that important information was missing from the unscripted version, that I had previously missed opportunities to draw explicit links between lectures, and that I was spending too much time on some topics and too little on others. It takes a long time to write a script for a lecture, but it’s time well spent.
Scripts also make it easy to add closed captioning to your videos. You just upload a plain text file with a transcript of the lecture to YouTube, and it figures out the timing of the words by analyzing the audio portion of your video. You can see what this looks like by clicking the “CC” button in any of the lecture video examples I’ve provided. Captions are required by the Americans with Disabilities Act, and universities have been sued for failing to provide captions in their courses, so you need to do it even if you don’t have any students with hearing impairments. Also, the captions are not just for people with hearing impairments. Students with unimpaired hearing occasionally have trouble understanding technical terminology (and getting the spelling right), and they will turn on the captions. In addition, YouTube can automatically translate your captions into hundreds of different languages. The translations are far from perfect, and they are not a replacement for your spoken English, but they can help international students understand your English.
The main problem with scripts is that they make it harder to have energy and enthusiasm while you’re delivering your lectures. I solve this in part by imagining that I’m speaking to an actual person. And I feel free to deviate from the script as the spirit moves me. Also, the script should be written in informal language, not like a journal article. For example, make extensive use of contractions and idiom (e.g., “Wow! That’s an amazing finding!” rather than “Thus, this experiment yielded an outstanding set of data.”). Before you try to record yourself delivering a script, you need to practice it aloud—you will find that things that sounded fine “in your head” don’t quite work when spoken aloud. Practice is necessary. This is one of the factors that makes it take so long to record lecture videos. But it also makes them much better.
Another advantage of scripts is that they can make it easier for you to speak rapidly. Rapid speaking is typically a problem in a live lecture, but it’s a good thing in a video. People can understand your speech faster than you can speak, and it’s boring when someone speaks too slowly in a video. When I watch video documentation, for example, I often wish that the person would speak more quickly and not waste my time with a slow lead-up to the real information: “Get to the point!” Thus, you will want faster speech and a higher temporal density of information in a video lecture than in a live lecture. In fact, some of the better students figure out a trick in YouTube that allows them to speed up the videos by a factor of 1.5. I wouldn’t recommend this for all students, but it’s an indication that they can usually understand things more rapidly than you can say something. And if the students miss something, they can just pause and rewind (which they will actually do, because they want to get the right answer on the quiz question that follows the lecture segment). Watch some lectures from college classes on YouTube (especially ones that are not professionally done), and you will see what to avoid.
Lecture Notes
In one of my pilot tests, I provided the students with lecture notes consisting of PDFs that had the images from the lectures but no text. My rationale was that the students would learn a lot more by writing down the main points themselves. I was totally wrong: The students had a hard time figuring out what was a main point and what was a detail, so they would either write down a bunch of irrelevant details or nothing at all. Now I provide PDFs that have shrunken versions of the images along with text giving the main points (you can see an example of a page of lecture notes here). An undergrad assistant took my PowerPoint and scripts and made the lecture notes (which then required only a little bit of editing on my part).
Using YouTube
There are several services that you could use to deliver the actual videos. I would strongly recommend against using something from your university’s IT department: When 200 students use it all at the same time the night before an exam, it will crash, and you will have a disaster. I used YouTube mainly because it can easily handle 200 or even 10,000 students without even stuttering. It’s also very easy to upload a transcript for closed captioning and can auto-translate the transcript into hundreds of different languages.
The main downside of YouTube is that, at present, there is no reasonable way to link it with a university’s authentication system to make sure that your videos are visible only by people registered for your class. YouTube has three different levels of access: Public, Unlisted, and Private. In Public mode, anyone can find your videos and watch them by searching for the relevant terms. You probably don’t want this (unless you are creating a MOOC). In Private mode, you need to provide the Google email addresses of everyone who wants to access your videos, and they will need to authenticate via Google to see them. This is unrealistic for a class with >25 students. The best compromise is Unlisted mode. In this mode, anyone with the URL for a video can watch the video. However, the videos do not come up in searches, so the only way someone can find the video is if you give them the URL. In principle, a student could figure out the URL and give it to someone else. However, the URL is not obvious when they watch a video embedded in a Captivate page, so this approach works quite well in practice.
Recording Lecture Videos: Technical Information
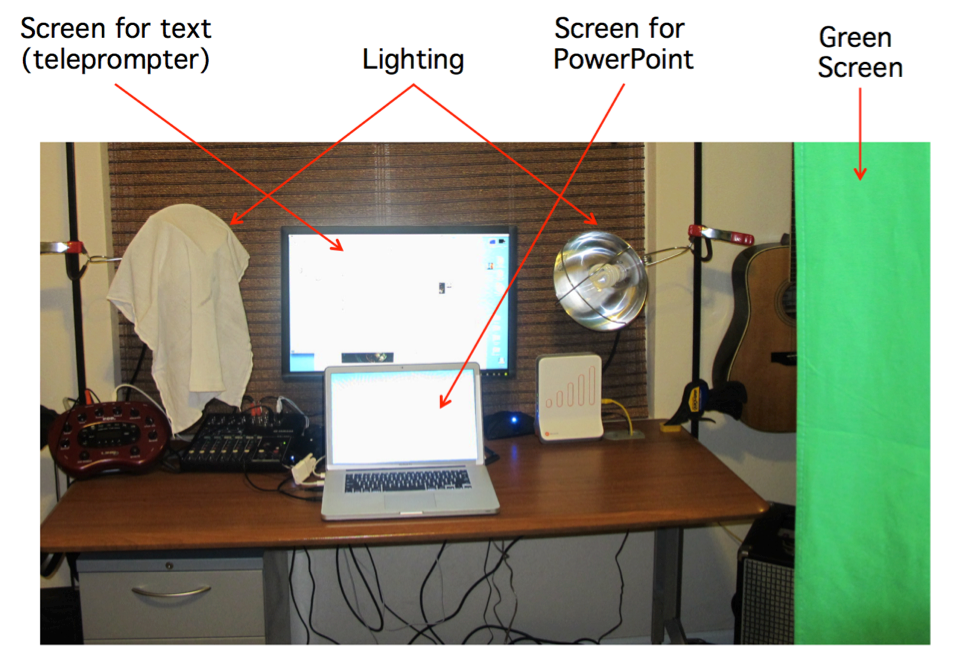 I built a simple recording studio in my home office for a few hundred dollars. The picture to the right shows what it looked like initially. I used a high-end ($100) webcam (Logitech HD Pro C920) and an inexpensive USB microphone (CAD u37, $50). Lighting is important, but I just used some simple shop lights with compact fluorescent bulbs. More recently I’ve switched to specialized videography bulbs (Fancierstudio Daylight), which are more intense and have a broader spectrum. I put a thin cloth over each light to act as a diffuser (you can see this on the light on the left side of the photo). You can instead get a pair of “softboxes” with stands for <$100 (e.g., Fancierstudio 9004S).
As described previously, you will want to use a script for your lectures. When I first started producing lecture videos, I put the script for a given PowerPoint slide in the Notes section of the slide, and I used two monitors to present the slides (using Presenter Tools). I could then read the script from the notes section and use Screenflow to do a screen capture of the slides on the other monitor. However, the video of my “talking head” looked awful because I was looking at the bottom part of the screen to read the script, which was quite far from the camera, so the video made me look like I was looking down instead of looking into the viewer’s eyes. Also, my eyes were clearly moving as I read the script, which just looked weird. I eventually started doing two recordings for every lecture, one of myself reading the script, and another with the PowerPoint slides, which I would then merge in Screenflow (which was trivial). To see the script during the recording, I would load the script into a special PowerPoint presentation, each slide of which contained just a couple sentences in a large font near the top of the screen (where the webcam was located). I would then read this script, using a clicker to advance from slide to slide (you can see the clicker in my hand in some of the videos). Then I would either (a) play back the recording of the lecture audio while I stepped through the regular PowerPoint lecture slides (using Screenflow to capture the PowerPoint to video), or (b) save the PowerPoint slides as JPEG files and then string them together into a continuous presentation in Screenflow. The second approach ends up being much more efficient unless you have complex animations or want to use the mouse pointer to point to various parts of the slides.
I shot most of the videos in front of a “green screen” (ePHoto 6×9 ft Green Chromakey Muslin Backdrop). Screenflow can make the green transparent so that I appear as if I’m standing in front of the images, as shown in the screenshots below (check out the region around my “talking head”).
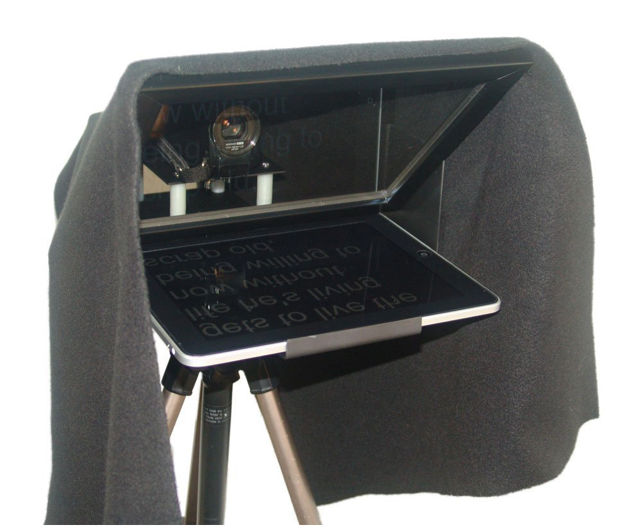 I’ve made some substantial changes to this process for the new course that I’m currently creating. For this new course, I bought an iPad-based teleprompter system (InteractMedia R810-10, about $165). You put a video camera inside the telemprompter, and it uses mirrors to project the iPad screen so that it appears on a sheet of glass right in front of the video camera. You can see the iPad screen, but it‘s effectively invisible to the camera. You put your script on the iPad, and then you can read it while staring directly into the camera (just like a TV news anchor). To present the script on the iPad screen, I use the PromptSmart Pro iPad app. I write the script on my computer in Microsoft Word and then transfer it to the iPad app via DropBox. The app uses the iPad’s microphone to listen to me read the script so that it can know which part of the script to show at a given moment. It works well.
Even the best webcams have pretty poor video quality. I therefore started using a mid-range consumer video camera to do the recording (Canon Vixia FH M500, about $320). I connect the HDMI output of the video camera to an HDMI capture box (BlackMagic Intensity, about $240), which then connects to my computer. The video quality is much better than it was with a webcam. Newer digital SLR cameras often have great video and could be used for this purpose (with a video capture box). For recording my voice, I’m using an Audio Technica AT875R microphone (about $170), run through a Yamaha MG102c mixer (about $150) and into the BlackMagic Intensity capture box. This increased the cost of my home studio by about $1000, but the audio and video quality of this new system is an enormous improvement over my original system.
I’ve also stopped using a green screen. It’s just too hard to get it to be perfect. Instead, I use a collapsible screen (Fotodiox 5’ x 7’with a Lastolite 3355 stand) with a solid blue background (and a green screen on the other side if I ever need it). By using the blue background, I can make the lectures relatively consistent independent of where I shoot, the current lighting, etc.
Editing the Lecture Videos
You may be able to read a script with energy and emotion for 5 minutes without any odd pauses, mispronunciations, garbled words, etc., but I cannot. Fortunately, Screenflow makes it really easy to edit out the little goofs. When you goof up, just stop speaking, wait a couple seconds, and start over again at the last point where you paused. You can then delete the goof-up and do a crossfade to link the sections before and after the goof-up. Here’s an (embarrassing but typical) example before and after editing.
Original Unedited Video:
Video After Removing Goof-Up:
You can see the crossfade in the edited video (around the 7 second mark), but it’s very subtle, especially when the talking head is a small part of the overall video. And if you look at the YouTube videos that teenagers watch (typically made by a 22-year-old college drop-out with 5 million followers), you’ll see that they do even more abrupt cuts in their videos. Your audience won’t mind, and it will actually make your videos seem “edgier.” By the way, doing these crossfades is trivially simple in Screenflow but is more time-consuming in Camtasia, which is one of the reasons I prefer Screenflow.
Copyright Issues
You need to be careful about copyright issues, especially if you’re using YouTube to host the videos. There are legal reasons for this, but even if it weren’t for the legal issues, you should ask yourself the following question: If you made an image (e.g., for a journal article, or even a photo of your spouse or kids on your personal Flickr account), would you want it to end up in somebody’s lecture videos that are seen by hundreds or thousands of strangers without your consent? Probably not. I know I wouldn’t want the fruits of my labors being used by some random person without my permission. Consequently, the kinds of images you grab from the Internet for a live lecture (or even a conference presentation) may not be appropriate for lecture videos. Fortunately, lots of people and organizations make images available for use via Creative Commons licenses (or explicitly release their images into the public domain). You can find images (and videos, sound files, etc.) that have a Creative Commons license by using the search tool at search.creativecommons.org. It will automatically search multiple sources (including Google Images), but it will automatically limit the search to images that are tagged with an appropriate license. Many of the images ultimately come from Wikimedia Commons, which is essentially the storehouse for images and other media used by Wikipedia (but with additional images that are not found on Wikipedia). Many others come from Flickr (from people who have explicitly provided a Creative Commons license). DeviantArt is another good source that will show up in some of your searches. However, keep in mind that you need to search for images that are licensed for use (which is easiest to do by starting the search at search.creativecommons.org).
Limiting yourself to images with a Creative Commons license is an important first step, but a second step is also necessary: You must acknowledge the owner/creator of the work and provide the license information in your video. (This is not legally required for public domain images, but it’s the polite thing to do if you have information about the creator.) Some people implement this by putting the license information on the PowerPoint slide that contains the licensed image. I find that distracting, so I put the license information in a set of “credits” at the end of each video segment (see the end of the example video).
You should also include a copyright notice in the videos you create. This may protect you from having some faceless corporation steal your hard work.